Macrame Coaster DIY: Step-by-Step Guide with 2 Simple Knots
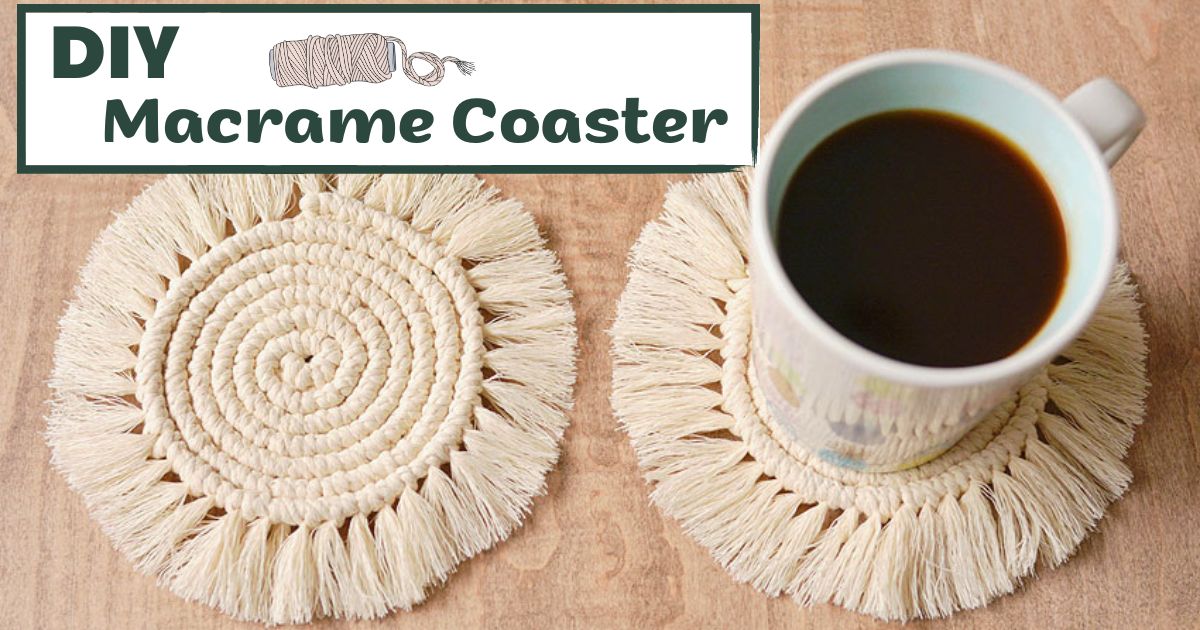
Macrame’s back, folks, and it’s cooler than ever! You know, those fancy knots and patterns you see around? They’re giving our homes a lovely touch of the good old days. And there’s one cool thing that’s caught my eye: macrame coaster diy. If you’re thinking, “Hey, I wanna make one of those awesome coasters!” then you’re in the right place. Seriously, even if you’re new to this, it’s a breeze. You just need two basic knots. Imagine these coasters jazzing up your place, being the talk of the party, or even as a special gift for someone.
What Are The Basic Knots For Macrame Coaster DIY?
So, making a macrame coaster diy is all about getting a few key knots down. I’ve been messing around with macrame for a bit and guess what? A few simple knots, and bam! – all these awesome patterns start to show up. Here’s the lowdown on the main knots you’ll wanna know for making that cool coaster.
Lark’s Head Knot
This knot’s kinda like the gateway to macrame magic. It’s the one you use to get your cord onto stuff, be it a stick, a ring, or even another piece of rope. So here’s how I do the Lark’s Head Knot:
- First, decide how long you want your cord and chop it. Then fold that baby in half so the ends touch.
- Bring the folded part up to, say, a stick (or whatever you’re using), loop it from the front and take it round the back.
- Now, with the loop at the bottom, pull both ends through.
- Give both ends a good tug to tighten it up, and voilà!
Double Half Hitch Knot
Okay, this knot’s a big deal in the macrame scene. It’s the one that gives you those neat rows of knots across your work. Here’s how I rock this knot:
- First, grab the left cord and stretch it out horizontally – that’s your guide cord.
- Now, the next cord on the right is the one you’re gonna work with. Pull it over the guide cord, loop it around and under.
- Do it once more, and you’ve got yourself a pair of neat knots side by side. That’s the Horizontal Clove Hitch!
- Just rinse and repeat with the other cords, working your way across.
How to Make Macrame Coasters DIY
The macrame coasters are not only handy, but they also jazz up any room. Plus, they’re awesome for newbies to macrame. So if you’re itching to make these funky coasters for your space or as a killer gift, here’s the lowdown.
Stuff You’ll Need
- About 25 feet of 3mm Macrame cord
- Some super glue
Tools:
- Measuring tape
- Scissors
- Tape
- A fine comb or one of those wire pet brushes
Instructions:
1. Start with the Basics:
- Snip off a 60-inch bit from the cord and another five pieces, each about 32 inches long.
- Twist the 60-inch cord into a loop, about 3 inches wide.
- Hook up the 32-inch cords to the loop using that lark’s head knot trick. This means you fold the cord, put the loop under the circle, pull the ends through, and yank it tight.
- Give both ends of the 60-inch cord a tug to secure the circle. This will be the heart of your coaster.
- Trim the short end of the 60-inch cord and hide it under the center bit.
- To make things easier, tape some cords to your table. Got a cork or macrame board? Pinning the middle of the coaster works wonders.
2. Time to Knot:
- The double half hitch knot is your buddy here. Use the long 60-inch cord (we’ll call it cord 1) as your mainstay, and start knotting the next cord (cord 2) around it. Do it twice and roll with this pattern for the other cords.
3. Filling in the Blanks:
- As you keep knotting, you might see some gaps. If that happens, measure the last cord you knotted with cord 1, double it, and snip a new piece.
- Hook this new cord to cord 1 with the lark’s head knot trick. This’ll cover up that empty space.
- Keep on knotting and add more cord when you need to until your coaster looks just right. I usually aim for about 6-7 full circles.
4. Make It Shine:
- To wrap things up, pull the end of cord 1 through a gap, taking it to the back and pulling tight.
- Chop off the ends of the cords you hid earlier and dab a little super glue to make sure everything stays put.
- Make a cute fringe by cutting the leftover cords and brush them out with your comb or pet brush. Trim the fringe however you like.
Boom! You’ve got a macrame coaster diy ready to rock your table. Trust me, the buzz you get from this DIY project is next level. Enjoy and keep those fingers knotting!
Dive in and blossom your skills! Discover how to craft the perfect macrame flower. Read more now!
Why Are Your Macrame Coaster DIY Not Flat?
When I first got into the whole macrame thing, I was buzzing seeing my coaster come together. But man, was I bummed when it wouldn’t sit flat! If you’re going through the same rollercoaster, don’t sweat it. Let’s figure out why this happens so you can nail that perfect coaster.
- Too Tight on the Knots: Macrame’s all about those snazzy knots, right? But if you’re going overboard and pulling them super tight, that might be making your coaster all wobbly. Just keep it cool and consistent.
- Getting Heavy-Handed: That 60-inch cord (let’s call it cord 1) is kinda the backbone of your coaster. Yanking it too hard just messes things up, making it all lumpy and stuff.
- Not Enough Extra Cords: Plugging in those extra cords makes sure everything’s nice and even. Skip on that, and you might end up with gaps or weird bumps messing with your coaster’s vibe.
What to Do About It? If your coaster’s acting up and not sitting flat, here are some chill hacks:
- Chill on the Pulling: Give the edges a gentle tug. It’s like giving your coaster a mini massage to even things out.
- The Old Heavy Trick: Dump something heavy on it – like your go-to jar of peanut butter – and let it do its thing. Might help it chill out and go flat.
But if these tricks are a no-go and the middle’s super tight, sometimes you just gotta breathe and start over. Macrame’s all about the ride, not just the finish line. Every go just makes you better at it!
Can You Wash Macrame Coaster DIY?
Well, good news! You can totally clean them. But hey, there are a couple of things to remember if you want them to keep rocking that boho vibe.
1. Quick Dust-Off: For the everyday stuff like dust, I just grab a lint roller or some sticky tape. Quick, easy, and it keeps the coaster feeling nice and textured.
2. Oops, Spilled Something?: We’ve all been there. A little spill here and there. No biggie! Just grab a soft cloth, dip it in some mild soapy water (no bleach, please!), and give it a gentle wipe. Let it air dry somewhere breezy, but keep it out of direct sun. Trust me, you don’t want it shrinking or going a weird color.
3. Those Stains that Just Won’t Quit: Got a stubborn mark that’s doing your head in? Time to bring in the big guns: the washing machine.
- Pop your coaster in a wash bag or a tied-up pillowcase. This’ll keep those knots and threads safe.
- Use warm water and hit that delicate cycle. It’s the best way to make sure your coaster still looks and feels ace.
- After it’s done, I always air dry mine. Helps them keep their shape and avoid the dreaded shrink.
Diving into the world of “macrame coaster DIY” projects can be both exciting and a tad challenging. Whether you’re crafting your first piece or troubleshooting issues, understanding the nuances makes all the difference. With the tips and tricks we’ve shared on BeanDaikon, you’re now equipped to create, care for, and show off your boho-inspired coasters. Embrace the art, and let your creative juices flow!


